
Cabin Closing Proceedures
Fintry – Cabin Closing Procedures: Turning off Water at Cabin
(revised by Sheila February 2023)
Steps to Turn off the Water
Before beginning this process, ensure that you have plumbing antifreeze on hand for the final step.
(See Step #16 below.) Note: a minimum of one and a half (1 ½) containers which hold 3.78L each of plumbing antifreeze, are needed.
- Shut off breaker for hot water tank.
(Clearly marked on breaker panel; 2 breakers are connected and turn off together - Shut off water UNDER the cabin.
(In storage room, red valve on main water line closest to the rear of the cabin. The valve is operated with the red knob and is labelled on a facer board nearby.) - Hook a hose onto the cold water tap.
(faucet) located on the ceiling in the storage, just inside the door (labelled “cold) and place the other end of the hose where it can drain onto the beach. Open that ceiling cold water valve.
Do not open the washing machine hot water valve at this time. - Close water valves (taps) on washing machine.
Then disconnect hoses from washing machine (pliers work best). Place ends of hoses in a nearby can or container to drain. (Very little water)
Later, these washing machine valves will be opened for drainage. - Shower stem in main bathroom
Ensure that shower stem in main bathroom is drained (lift plunger that engages showerhead repeatedly so that water drains). - Open all taps in the cabin.
Do not open taps under walkway, for the moment. Open all taps in storage room under the cabin WITH THE EXCEPTION of the hot water tap in the ceiling, just inside the door, but the tap closer to the fridge. (The tap closer to the door is the cold water tap and presently has a hose attached to it and the end is draining on the beach.) - Drain the Hot Water Tank
Manually Drain the Hot Water Tank (new tank in 2021).
NOTE: The breaker for the hot water tank should have already been shut off in Step #1 above. If this has not been done, the hot water tank cannot be drained without damaging it. Heating elements can break if they turn on when the tank is empty.Attach a hose to the drain valve at the bottom of the hot water tank and place the end of the hose outside in an area where the water can drain. Open the valve and drainage will begin.Please consult the following additional instructions.
Additional Important Instructions from Internet:
On the Signant Two.com website, please look in the section Maintenance: Procedures Manual.
Locate the video and list of steps for draining a hot water tank entitled, “How to Drain the Water Heater,” by Sears Parts Direct.This short video explains a simple extra step that can be taken in order to drain the sediment from the tank, apart from simply draining the tank.
Rationale: Over time, sediment can build up in the tank, eroding the tank bottom and damaging the lower heating element.Draining/Flushing out the sediment is easy to do and will increase the tank’s efficiency and longevity.
Please watch this short video in order to flush out the sediment when draining the hot water tank.
The written steps for the procedure are under the video in the link.
Thank you.
Open the hot water tap
When the hot water tank has stopped draining manually, open the hot water tap in the ceiling in the storage, just inside the door, the upper tap closer to the fridge, and open the two taps outside under the walkway (hoses should already be disconnected from these taps, including the drip line hose). Empty buckets should be placed under the taps under walkway and in storage room as there will be small amounts of water draining.
- Shut off the underground water valve
Shut off the underground water valve behind the back corner (North West) of the cabin behind the third bedroom, using the neon yellow-coloured “water key,” turning the valve 90 degrees to the right, such that the wings of the water key are virtually perpendicular to the back wall of the cabin. (See Instructions for using the Yellow Water Key to Turn off the Valve.)
Instructions for using the Yellow Water Key to Turn off the Valve:
Look down the above-ground valve access shaft outside the NW corner at the rear of the cabin. Part way down the shaft, you will see the valve shut off mechanism, which is a small rectangular prism made of metal, approximately 1 cm wide, 2 cm deep and 3 cm long. The water key slides overtop this small rectangular prism using a slot at the end of the key. You will turn the “wings” of the water key clockwise to turn the valve to the closed position.
The following photos show the water key in both the open and closed positions (on and off).
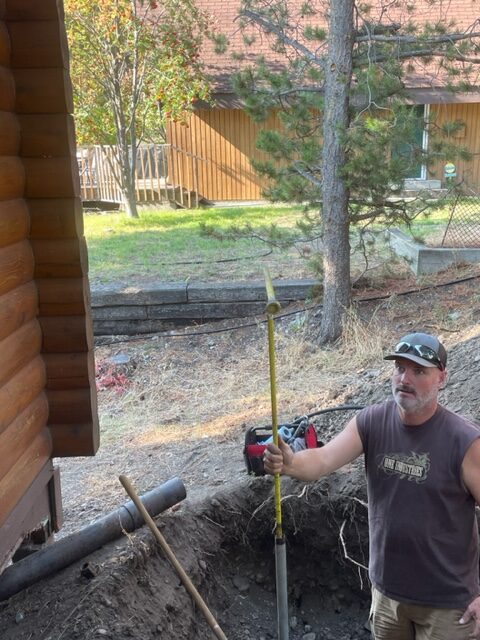
Underground Water Valve Open
wings of water key are virtually parallel to the back wall of the cabin.
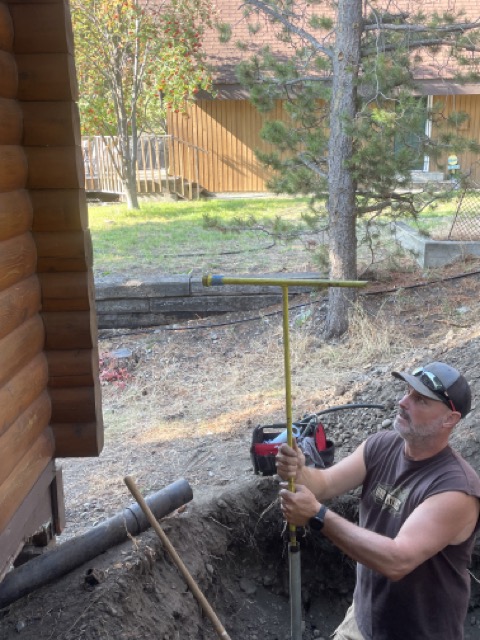
Underground Water Valve Closed
After turning the key 90 degrees to the right (clockwise), the wings of the water key are virtually at a 90 degree angle to the back wall of the cabin (perpendicular).
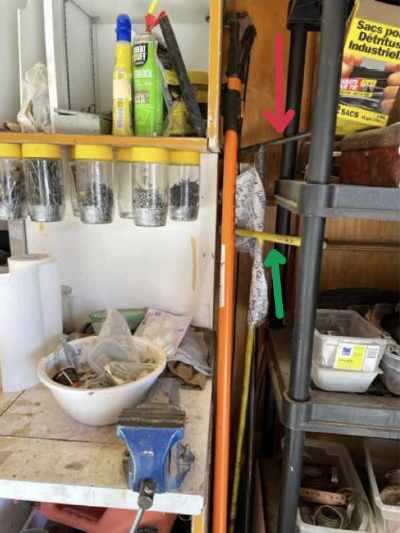
Photo showing location of both the Old (black and taller, behind new water key — red arrow) and New (neon yellow and shorter — green arrow) Water Keys.
Only the new (neon yellow) key is to be used for turning on and off the Cabin Underground Water Valve, as of October 2022.
(Location of both is to the right of the workbench in boathouse where they both stand vertically upright and are clearly labelled as Old & New Water Keys.)
(NOTE: OLD WATER KEY NEEDS TO BE KEPT because it is the one that can access the Fintry Utilities underground water valve out by the road and next to our driveway. This valve is only to be operated by Pete Muhlberger, Fintry Utilities – 250-503-6334 –however, if we were experiencing flooding and could not reach Pete Muhlberger, then in the case of such an emergency, we could use that old water key and turn off the water out at the road in order to prevent further flooding. Better to rectify the situation and ask for forgiveness later.)
Cautionary NOTE Regarding Shutting Off Water at Underground Valve:
Immediately after the water is shut off, water may well up in the vertical shaft enclosing the underground valve. This did not happen in October 2022 when the valve was closed by Sheila for the first time; however it is common with underground valves and there is a drain down near the valve itself where this water would dissipate into the surrounding soil should water well up. It took more than one hour for this “welled up water” to dissipate in Oct 2016, (with the original valve) but the next morning the water was completely gone. This eventual absence of water was taken as evidence that the valve had been successfully closed.
With the old valve (prior to October 2022), Sheila was aware that if the water welled up, then overflowed the enclosure and continued to flow, this would be an indicator that the valve had not closed successfully. This would be problematic.
(In fact, this has never happened.)
Note: In the event that one could not get the water to stop, in the above scenario, and the water overflowed the shaft, one would return the valve to the “open” position, if possible. Follow-up would then be essential. If the valve could not be properly closed, the water would need to be left on over the winter, as we did in the winter of 2015 – 2016, with the cabin drained only to the point of the under-the-cabin shut off valve (red knob) and minimum heat would possibly be needed in the storage area (utility room) throughout the winter so that the section of pipe prior to the under-the-cabin shut off valve (red knob) would not freeze. However, Carson has installed heat tape on this section of pipe and this strategy MAY be adequate for keeping that section of pipe from freezing in the winter. We would need to discuss and evaluate whether or not additional heat would be required, were we unable to completely close the underground water valve.
With the new water valve, as of October 2022, we are not yet aware of problem situations that could arise in its closing, so records will need to be made in the event that such a situation arises.
10. Under-the-cabin valve
After successfully closing the outside underground valve, re-open the under-the-cabin valve in the storage room (valve closest to rear of cabin, red knob). This will allow drainage of the water between the under-the-cabin main valve and the underground valve behind the third bedroom.
11. Washing machine valves
Open the washing machine valves (knobs) for both hot and cold after placing an empty can or bucket under each. This will ensure drainage of water in the line leading to the taps.
12. Weep holes
In the storage room, just East of the fridge, near the ceiling, loosen the drain caps on the 2 valves on the hot and cold water lines going to the kitchen sink. These are labelled on bridging boards, “weep hole#1” and “weep hole #2.” This will allow those two lines to drain. It is recommended that the drain cap be loosened to allow water flow, but not detached in order to avoid losing it, as they are very small and it would be problematic if they were lost.
Note: Sheila wants to mention that formerly, drain caps for the weep holes were left on the bridging boards directly above the weep holes, by Dale, to be replaced in the spring when the water was turned back on. Sheila has found that the drainage works when the caps are not removed completely so she recommends leaving the caps on, but simply loosened. If a cap were lost, it would be problematic when the water was turned on again in the spring. We would have nothing to close the weep hole and water would escape constantly. It might be difficult to find a replacement weep hole cap.
13. Third drain cap
There is a third drain cap, “Weep hole #3,” which is along the main water line, about 2 steps North of the position of the washing machine, but over on the main water line. This cap does not come off completely, but opens to allow drainage of the line leading to taps under walkway.
14. NOTE: There used to be a drain screw to be removed beneath the under-the cabin valve in the storage room. This drain screw can no longer be removed because the hole was leaking and someone permanently attached a drain screw. So do not try to remove it.
15. Flush both toilets
Flush both toilets to dispose of as much water from the toilet tanks, as possible.
(NOTE: toilets could be used up to this point during the process, without flushing. So this is a person’s chance to have one last pee prior to flushing!!)
16. Toilet tanks and Bowls
Sop all the remaining water out of the 2 toilet tanks and the 2 toilet bowls using a small container and then rags. Sheila has placed a labelled small green container under the basin in the main bathroom. It is an ideal size for removing the water. Dump this water down the basin as it will simply go to the septic tank. Use rags to remove the final bits of water in the tanks and the toilet bowls.
17. Antifreeze
Place plumbing antifreeze in kitchen sink, 2 bathroom basins, tub drain, 2 toilet bowls and 2 toilet tanks.
(Several brands available. Dale used “Prestone Plumbing Antifreeze: Ideal for use in RV’s, boats, cottages & pools. -50C burst protection.” You will need a minimum of 1 ½ of these containers which hold 3.78L each .
NOTE: one container is not quite enough. Sheila has an empty container in boathouse on which she has written exactly how much antifreeze to place in each area and these amounts are indicated below.
Amounts of Plumbing Antifreeze to Place:
Kitchen sink, 2 basins, tub drain – 1 ½ to 2 cups, approx. (fills the trap)
Toilet bowls – 1 ½ to 2 cups
Toilet tanks – 2 to 3 cm (about a good inch)
It is better to err on the side of having too much antifreeze.
Sheila usually simply uses the contents of 2 full containers.
18. All Valves Open
Leave all taps IN and UNDER the cabin in the OPEN position. Leave all weep holes OPEN.
Leave the under-the-cabin water valve (red knob) OPEN so that all water and moisture between it and the underground valve can escape.
Amounts of Plumbing Antifreeze to Place:
Kitchen sink, 2 basins, tub drain – 1 ½ to 2 cups, approx. (fills the trap)
Toilet bowls – 1 ½ to 2 cups
Toilet tanks – 2 to 3 cm (about a good inch)
It is better to err on the side of having too much antifreeze.
Sheila usually simply uses the contents of 2 full containers.
ADDENDUM:
Given the leakage at the new underground water valve in February 2023, Shareholders agreed at the Signant Two AGM Part II (March 21, 2023) to add the following additional step to the above cabin drainage process:
After a period of time has elapsed following the drainage of the cabin, that period being at least a week, someone will go to the cabin and CLOSE the under-the-cabin water valve. (Rick and Sam could be asked to do this since they have done it before.)
Rationale:
The intervening time would have likely been ample to drain the section of water line between the under-the-cabin water valve and the underground water valve.
Having the under-the-cabin water valve closed for the rest of the winter would be helpful in the unforeseen event that the underground water valve began to leak or fail, allowing water to move toward the under-the-cabin water valve. Having the under-the-cabin water valve closed would avoid a situation where, if there were enough water pressure moving a good quantity of water past the underground valve, there would be flooding in the storage room through all the open valves and taps.
Note that subsequent to Shayne Watson’s repair of the underground water valve on March 16, 2023, the valve is expected to be “good as new,” and the problem that had occurred was, in fact, due to an error in the original installation of the valve in September 2022.
(REMINDER: As noted in the Cabin Opening Procedures, BEFORE turning on the water at the underground water valve in spring, the under-the-cabin water valve (red knob) should be closed. all taps should be closed in the cabin and all weep holes and taps should be closed under the cabin and under the walkway.
ONLY then should the underground water valve be opened, (by turning it 90 degrees counter-clockwise with the yellow water key) and LASTLY, the under-the-cabin water valve in the storage room can be opened.
If taps and weepholes are not closed prior to opening the under-the-cabin water valve, there will be water spraying all over!!…………..not recommended……..)